How to make a crochet coat: super pattern and video tutorial by Ahuyama Crochet
Hello to all you Katia crocheters out there! I´m Helena from Ahuyama Crochet and I want to show you how to make a crochet coat. I´ve wanted to do a crochet coat like this for a very long time. Firstly, because I fancied doing something different; and secondly, because there´s nothing better than a garment made using our own fair hands. After giving it a lot of consideration –the idea of making a crochet coat is a little bit daunting, don´t you think?– I got to work. And, the good news is that it actually doesn´t take that long to make a crochet coat! In part, thanks to the delicious chunky yarns used to make it: Katia Peru and Katia Azteca Milrayas.

You´ll find the written instructions I´m sharing with you here, and furthermore, you can also see the video tutorial on my YouTube channel: how to make a crochet coat.
How to make a crochet coat
Materials for sizes: S/M/L: 10 balls Katia Peru (col. 10), 2 balls Katia Azteca Milrayas (col. 706), size J10 (U.S.)/(6 mm) crochet hook, scissors, wool sewing needle and tape measure.
Stitches
- ch st = chain st
- sc = single crochet
- h.d.c. = half double crochet
- dc = double crochet
- 2 dc tog = 2 double crochet worked together
- ss = slip st
How is the pattern worked?
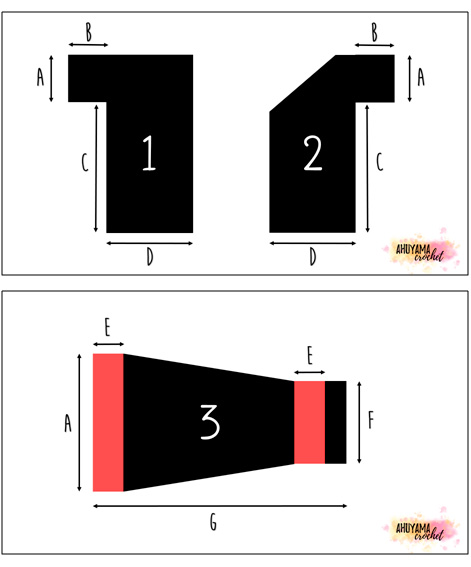
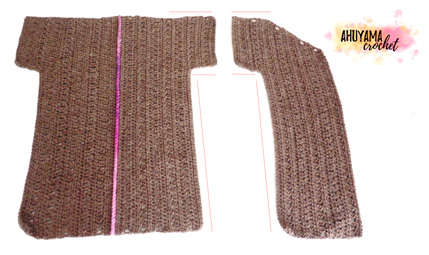
- We will start with the back (PIECE 1 in the image).
- Then continue with the front part (PIECE 2).
- Then we will join these pieces to form the base of our coat.
- We will continue with the sleeves (PIECE 3), crocheting in the round until we arrive at the cuffs.
- Then we will crochet the revere of our coat along the whole edge of the front part and the neckline.
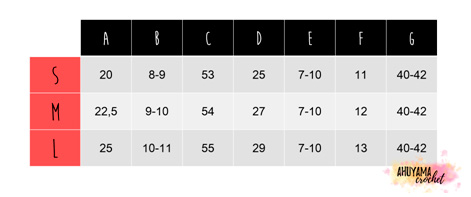
You´ll find the diagrams with the forms and a size chart with the measurements (in inches and cm) for each piece here.
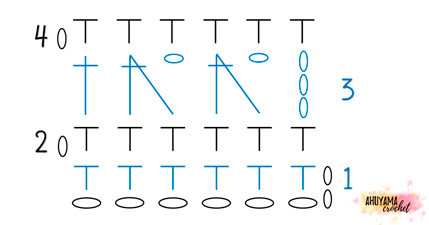
For the back and front part we will use the following stitches (described row by row in the instructions):
Back
Start: Using Katia Peru. Work enough ch sts, in an even number, to reach measurement A of your back size, plus an extra 2 ch sts.
Row1: 1 h.d.c. in the 3rd ch st from the crochet hook, 1 h.d.c. in each ch st
R2: 1 ch st, turn work, 1 h.d.c. in each available stitch.
R3: 4 ch sts (counts as 1 dc and 1 ch st), turn work, skip first st, 2 dc. tog, *1 ch st, 2 dc tog *, repeat from * to * until only 1 st remains on the hook, 1 dc.
R4: 1 ch st, turn work, 1 h.d.c. in each stitch or hole (the hole are formed by the ch sts on the row below).
R5: until Rx: Repeat instructions from R2 to R4 until arriving at measurement B of the back. Finish with a R3 (= the row with the 2 dc tog). After the last dc work as many ch sts (in an even number) as needed to reach measurement C of the back, work 2 extra ch sts.
Rx+1: 1 h.d.c. in the 3rd ch. st. from the crochet hook; 1 h.d.c. in each available ch st until arriving at what has been worked previously; 1 h.d.c. in each stitch or hole available from the row below.
Rx+2 onwards: Repeat the instructions for R2 to R4 for the whole length until arriving at measurement D of the back. Finish with a R4. Cut yarn.
Half the back is ready! Now crochet the other half using the same instructions. Join the two halves of your back at the centre using Katia Azteca Milrayas.
Front part
Work the same as the back as far as Rx+1, then continue working as follows:
Rx+2: Repeat instructions of R2.
Rx+3: Repeat instructions of R3.
Start increases at upper part to create the coat neckline shaping as follows:
Rx+4: 1 ch st, turn work, 1 dec. of h.d.c., continue with instructions for R4.
Rx+5: Repeat instructions of R2 until 2 spaces remain and work 1 dec. of h.d.c.
Rx+6: 4 ch sts, turn work, skip 2 stitches, 3 dc. tog, 1 ch st, 2 dc tog., continue with instructions of R3.
Rx+7: Repeat instructions of R4 until 2 spaces remain and work 1 dec. of h.d.c.
Rx+8: 1 ch st, turn work, 1 dec. of h.d.c., continue with instructions of R2.
Rx+9: Repeat instructions of R3 until 5 spaces remain and work 3 dc tog, skip 1 stitch, 1 dc.
Rx+10 onwards: Continue repeating the instructions of Rx+4 to Rx+9, until arriving at measurement D for the front part. The decreases at the upper edge create the coat neckline, the depth of the neckline is not important.
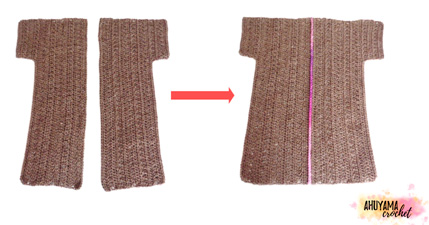
Join these two pieces to the back at the sides and the shoulders using slip stitch, as shown in the following image. Now we have the base of the coat.
Sleeves
The sleeves are made in 4 phases. We will crochet in the round from the shoulder to the cuff.
PHASE 1
Join a length of Katia Azteca Milrayas to any stitch at the base of the shoulder.
R1: 1 ch st (this does not count as a stitch), 1 sc in each stitch, close with a ss.
R2: 1 ch st (this does not count as a stitch), 1 h.d.c. in the back loop of each available stitch, close with a ss.
R3 onwards: Repeat the instructions of row R2 until you reach measurement E.
PHASE 2
Change to Katia Peru.
R1: 1 ch st (this does not count as a stitch), 1 h.d.c. in the back loop of each available stitch, close with a ss.
R2: Work the same instructions as R1 but working a dec. = h.d.c. at the two opposite ends of the fabric.
R3 onwards: Repeat instructions from R1 to R2. The decreases will close the sleeve little by little. Continue until arriving at measurement F. Make sure to finish with a row with an even number of stitches.
PHASE 3
Change to Katia Azteca Milrayas. Repeat the instructions of R1.
PHASE 4 (cuff)
Change to Katia Peru.
R1: 1 ch st (this does not count as a stitch), 1 h.d.c. in each available stitch. Close with a ss.
R2: 2 ch sts (these don´t count as stitches), *1 dc with relief at front, 1 dc with relief at back*, repeat from * to * until the end of the row.
R3 and onwards: Repeat the instructions of R2 until the whole sleeve reaches the length measurement G or longer if you want to go for an oversize style. Cut yarn.
You´ve finished one sleeve! Now make another one with the same measurements. 🙂
Revere
Using Katia Peru. To even out the edge of the coat and make it all the same, work h.d.c. around the whole edge of the neckline and the collar. Work in the spaces you can see are free. Cut the yarn.
Using Katia Azteca Milrayas at about 3 1/8” – 3 7/8” (8-10 cm) from the lower front edge: Join the length of yarn to the back loop of that stitch and continue as follows:
R1: 2 ch sts, 1 h.d.c. in the back loop of each available stitch. Repeat until you arrive at the other side of the coat, in the stitch opposite the one where you started.
R2: 2 ch sts, turn work, 1 h.d.c. in the front loop of each available stitch. Work the last h.d.c. in the 2nd ch st from the row below.
R3: 2 ch sts, turn work, 1 h.d.c. in the back loop of each available stitch. Work the last h.d.c. in the 2nd ch st from the row below.
R4 and onwards. Repeat R2 and R3 until you reach the width of measurement E, or until you reach the point where you want the revere to reach.
Done! Now your crochet coat is ready to be worn for the first time. I imagine, that just like me, you´ll be jumping for joy. Remember to share photos of the process and your final results on the Katia and Ahuyama Crochet social network pages using the hashtag #AhuyamaCrochetKatia. We´re so looking forward to seeing your coat!
A big hug and happy crocheting!
Helena