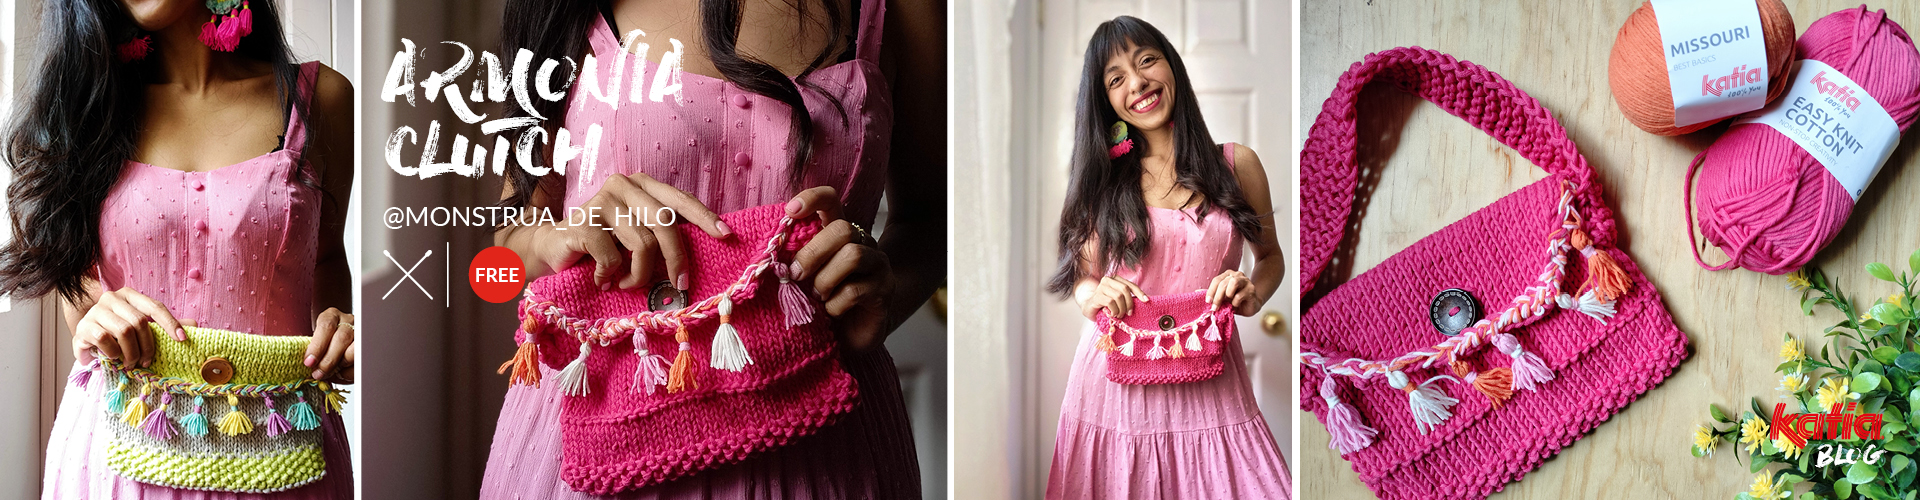
Tassel clutch knitting pattern 👝 Armonía design by @monstrua_de_hilo
This striking clutch knitting pattern, created by Miriam Vargas of @monstrua_de_hilo, is a real gem to start out in the world of knitting. With its simple construction featuring basic stitches, this handbag is perfect both for beginners who want to practice and experts looking for a relaxing project. You just need a ball of Katia Easy Knit Cotton and your favorite color combination of Katia Missouri!

Tassel clutch knitting pattern
Enjoy the fun this clutch knitting pattern has to offer! From its seamless construction to the decreases to shape the flap, each step helps you explore yarn and stitch combinations. Also, awaken your creativity by decorating your bag with a charming braid with colorful tassels.
Miriam Vargas @monstrua_de_hilo
Behind this design is Miriam Vargas @monstrua_de_hilo, designer and knitting teacher in our Facebook group Tejiendo Katia desde México. Her passion for colors and textures is reflected in each of her projects, and the Armonía Clutch is no exception. With unique style and exceptional skill, Miriam has created a pattern that invites you to play, experiment, and create surprising combinations. Her accessible approach makes this pattern easy to follow both for beginners and advanced knitters. Through her designs, Miriam takes you to a world full of beauty and creativity, where each stitch is a joyful brushstroke.

Step-by-step instructions for the Armonía Clutch
- It is worked seamlessly flat and bottom-up until the body is long enough. Next, decreases are worked at both ends to shape the flap. A buttonhole is worked in the middle of the flap.
- Make a braid and add tassels for decoration.
- If you wish, you can add a knitted or crochet strap.
- Of course, you can work the design in one or two colors of Katia Easy Knit Cotton of your choice.
Materials
- Katia Easy Knit Cotton color 18 (1 ball)
- Katia Missouri color 40, 60 and 3 (1 ball)
- 3-cm button
- US H-8/5-mm crochet hook
- 5-mm knitting needles
- Scissors
- Stitch marker
- Tapestry needle

Stitches and techniques
Stockinette stitch, garter stitch, seed stitch and side seam, right- and left-leaning decreases, buttonholes.
Seed stitch
- R1: *k1, p1*, rep from * to *.
- 2nd r and all following rs: work all the sts the opposite to how they present themselves, where there is a knit st p1, and where there is a purl st k1.
Side seam
Right- and left-leaning decreases
Gauge With 4.5-mm needles in stockinette stitch: 16 sts x 22 rs = 10 cm x 10 cm or 4 x 4”
Abbreviations
- cm: centimeters
- g st: garter stitch
- k: knit
- p: purl
- pm: place marker
- R(s) and r(s): row(s) and round(s)
- RS: right side
- seed st: Seed stitch
- sl: slip
- dec: decrease
- st st: stockinette stitch
- st(s): stitch(es)
Body of clutch
Border Using Easy Knit Cotton, cast on 34 sts and k 1 r. Pm to mark RS.
From R2 until end of body, always sl 1st st to right-hand needle and p the last st.
If you want to knit the piece in a single yarn, follow the instructions omitting the color changes. If not, choose one as the main color (A) and the other as the secondary color (B).

With color A, k R2.
Continue working 17 rs in st st.
K 1 r.
Work 6 rs in st st.
With color B, work 7 rs in seed st.
With color A, work 12 rs in st st.
Color B, work 12 rs in seed st.
Color A, work 10 rs in st st.
With color B, work 10 rs in st st.
Don’t cut yarn.
At the end, you’ll have a rectangle measuring 25 cm wide by 32 cm long.

Flap
The flap is constructed using color A in st st decreasing only on RS rs. Starting with a left-leaning decrease and ending with a right-leaning decrease. Until you have completed 7 dec on each side and have 20 sts left.
In the same way as for the body, always sl 1st st to right-hand needle and p the last st.
On the next r, bind off all sts.
Block piece and weave in the ends.

Sewing
Fold the body piece in half to make an envelope.
Align the r 8 rs below the first flap dec with the 1st r of the body. Make sure the ends match up. Side seam the sides.

Button
Sew the button 9 rs below the edge of the body, placing it in the middle of the r.
You can use sewing thread or separate the yarn you’re knitting with into two strands and use one of those.

Braid
Cut 2 lengths measuring 150 cm of each of the colors of Missouri and 1 of the color of your choice of Easy Knit Cotton.
Hold them together and fold in half.
Use a crochet hook to attach them to one of the ends of the flap.
Split the threads in three and start to braid. Make sure the braid isn’t too tight and covers the edge of the flap.
Tie a knot to prevent it from unraveling.
Use the crochet hook to pull the ends toward the back.
Split the ends and with 3 strands of Missouri sew the braid along the top, and with the other 3 along the bottom.

Cut and weave in the ends.
Lastly, leave the strands of Easy Knit Cotton loose and, if you like, sew a strap with them. If you want to skip this step, weave them in.

Tassels
Use different colors of Missouri to make 6 tassels and attach them to the braid with the crochet hook.

Strap (optional)
With Easy Knit Cotton, cast on 6 sts and p all sts of all rs until it measures 46 cm or as long as you wish.
Bind off sts and leave a tail measuring 20 cm.Adjust the strap and make sure it’s not twisted. Use the tapestry needle to sew it to each side of the bag.

Continue exploring and discovering new possibilities with this clutch knitting pattern, you’ll love it!
Any questions? If you have any comments, questions, or problems with the pattern, write to @monstrua_de_hilo. Miriam will be happy to help you!
Copyright. © 2023 @Miriam Vargas. All rights reserved.
