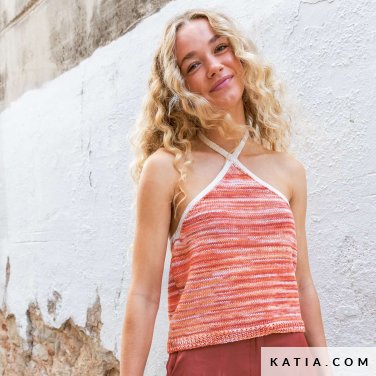
How to Crochet a meditation cushion - Free pattern

Learn how to crochet a square floor cushion that’s ideal for meditation

05/15/2023

crochet-floor-cushion-pattern-FEAT

Whether meditating is part of your daily practice, you’ve recently discovered its benefits, or you’re simply inspired to make a gorgeous, practical item; here’s your next project. Crochet a floor cushion with and this free step-by-step pattern from Mariska van de Neut, the designer and passionate crocheter behind Handmade Jolie.

This cushion is like a mattress cushion or zabuton pillow, made to improve posture and help you keep poses for a longer time. The pattern is worked in a simple but beautiful crochet stitch: half double crochet and double crochet stitches worked together as one. It’s easy to follow even for beginners and thanks to Katia’s XXL tape yarn, Big Ribbon, it can be made in no time. 

crochet-floor-cushion-pattern-graph-2


The materials you will need to complete this project are

  • 12 balls of Big Ribbon cotton yarn in a colour of your choice
  • 1 ball of the same yarn in a different colour 
  • Crochet hook size 10 mm
  • Tapestry needle
  • 2 x pillow 65 cm x 65 cm (from IKEA, for example)

Useful information for your meditation cushion project:

  • The final cushion is 65 cm x 65 cm x 9 cm
  • Gauge: 5 dc & hdc together as 1 stitch and 5 rows = 10x10cm / 4” square
  • The pattern is written using US terms
  • The cushion is worked in 6 separate parts: front, back, and 4 side panels, which are then worked together
  • Turn your work at the end of each row
  • Turning chains do not count as a stitch

Abbreviations:

  • Ch: chain
  • Sl st: slip stitch
  • Sc: single crochet
  • Hdc: half double crochet
  • Dc & hdc together as 1 stitch


crochet-floor-cushion-pattern-stitches


crochet-floor-cushion-pattern-graph

Crochet your meditation cushion

Front and back panel (x2)

  • With Big Ribbon colour 10, ch 36
  • R1: 1 hdc in 3rd ch from hook, 1 dc & 1 hdc together as 1 stitch in each ch across (34)
  • R2-R32: Ch 2, 1 hdc in 1st st, 1 dc & 1 hdc together as 1 stitch in each st across (34)
  • Fasten off and weave in ends


Border around the pillow

  • With Big Ribbon colour 3, work 1 row of surface sl st on both sides of your pillow (see image below)
  • Make a slip knot and insert your hook at one of the corners (see blue arrow) from the front to the back
  • Put the slip stitch back on your hook and pull through from the back of the pillow to the front
  • Continue making a sl st in each st across
  • Repeat on the other side.

crochet-floor-cushion-pattern-graph-2


Side panel A (x2)

  • With Big Ribbon colour 10,  ch 36
  • R1-R3: repeat R1-R3 from front and back panel
  • Fasten off and weave in ends
  • Make a border with surface sl st on both the sides. See graph below.

Side panel B (x2)

  • With Big Ribbon colour 10, ch 6
  • R1: 1 hdc in 3rd ch from hook, 1 dc & 1 hdc together as 1 stitch in each ch across (4)
  • R2-R32: Ch 2, 1 hdc in 1st st, 1 dc & 1 hdc together as 1 stitch in each st across (4)
  • Fasten off and weave in ends. 
  • Make a border with surface sl st on both the sides. See graph below.

crochet-floor-cushion-pattern-graph-4

Assemble your cushion

  • With Big Ribbon colour 3, attach all parts together with sc. 
  • Work in the loops only from the surface sl st or the st from the last row. 

Note: don’t work in the entire stitch, but only the 2 inner loops from both parts. See graph below.

  • Refer to the explanation images below: you can see the right side of the pillow with 4 sides
  • Attach the sides to the front panel (see pink lines)
  • Sc together the bottom of the sides (see red lines).
  • Add your (IKEA) pillows as you do this
  • With colour 10, close the side seams as shown with the blue lines


crochet-floor-cushion-pattern-graph-5


Fancy adding some more handmade cushions to your home decor? You’re in the right place. Here are some cushion patterns we think you’re going to love: