6 tips to easily follow Katia magazine patterns and knit your next project with confidence
As the saying goes: “All roads lead to Rome”, we all know how to apply it to our handicraft universe, right? There are more ways to knit than there are knitters in the world! Ok, we are probably exaggerating, but the truth is there are so many ways to learn how to knit. There are different ways to hold your needles: continental style or English, Portuguese, etc. Even stitch names can change in certain regions and languages. Still, everyone has their own ways, habits and preferences for knitting. These are often a combination of inherited knowledge, workshops, YouTube videos or self-taught learning. Regardless of your experience, whether you are a beginner or an expert, we will help you on your knitting journey! Here, we share 6 tips to easily follow the Katia magazine patterns and charts to knit our models effortlessly!

6 tips for following Katia magazine patterns
There are many Katia friends who have been knitting our designs for decades. They know all the ins and outs. But we are also aware that many beginners are knitting Katia patterns for the very first time. Since no one is born knowing everything, here are 6 tips to follow Katia magazine easily and knit your next project without doubts.
1 | Read the pattern, check measurements and mark the size
You have collected everything you need to start with the project that you have fallen in love with: Katia magazines or printed PDF patterns, hooks and needles, balls of yarn… We know you really want to start knitting, but, first:
- Take your time to carefully read the pattern. All of our patterns are available online in pairs of two languages: Spanish–English, French-Dutch and German-Italian.
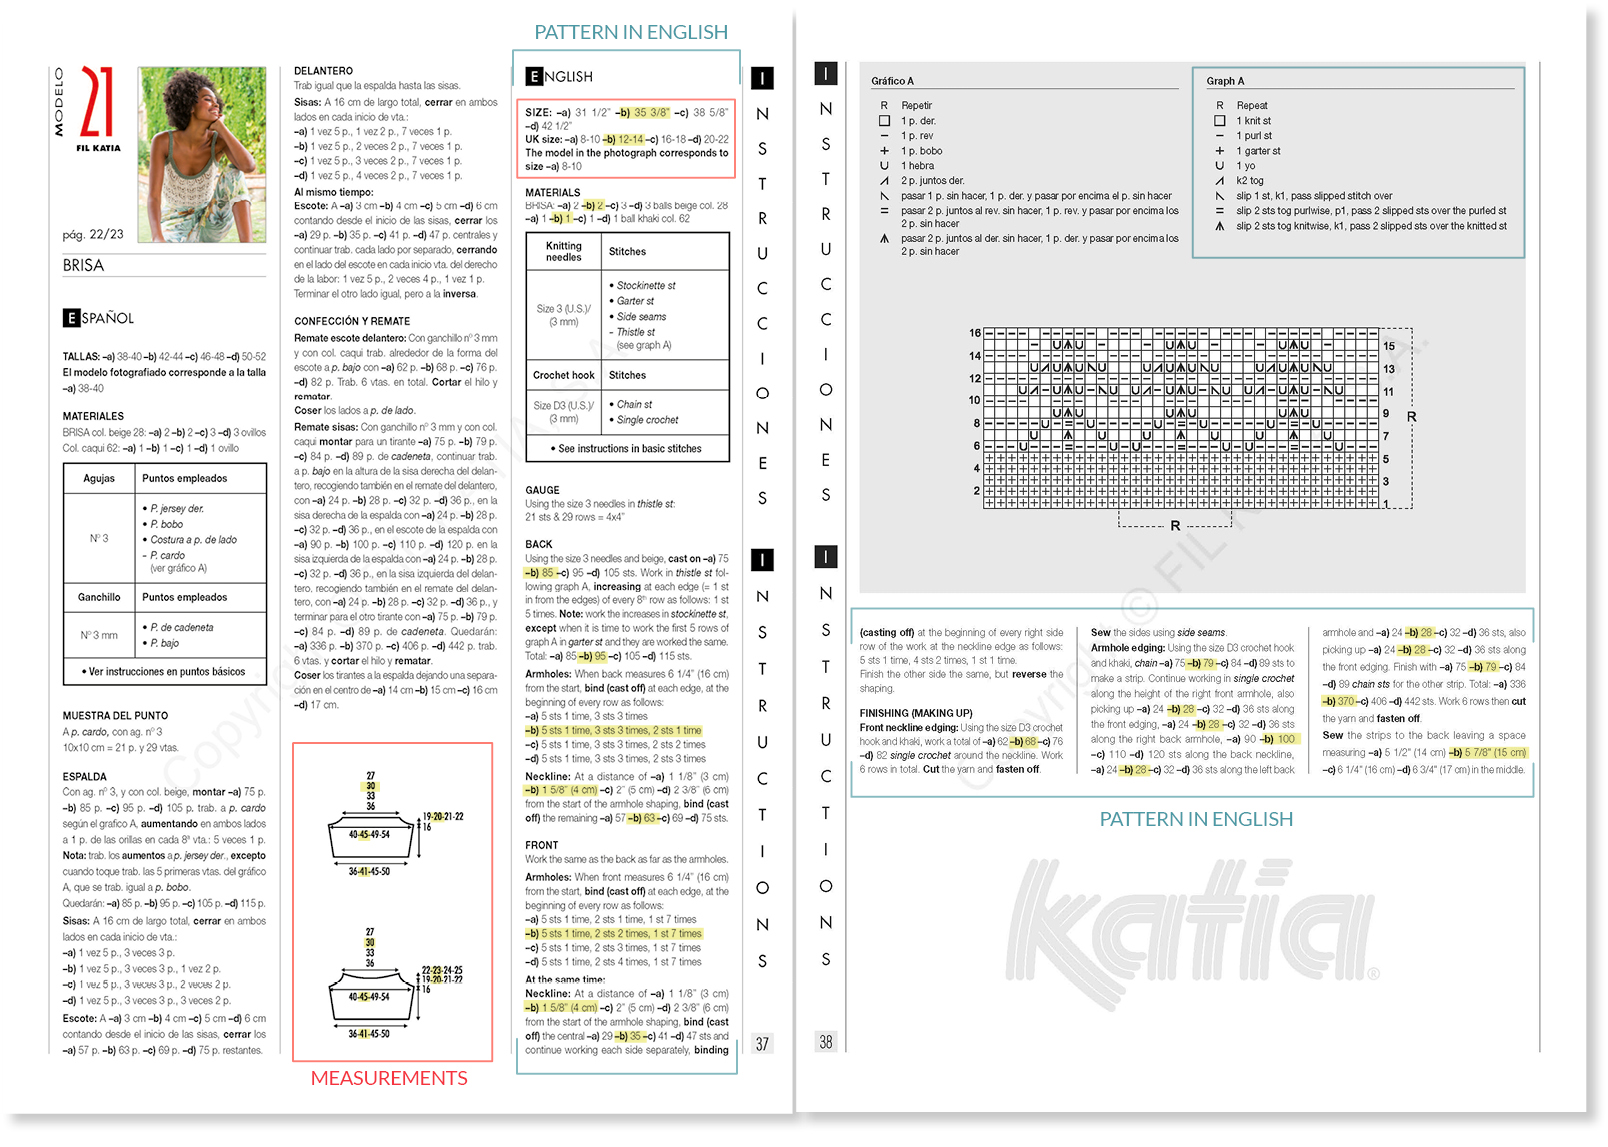
- Check the measurements indicated in the pattern to see the correct size and the number of balls required (see boxes in red). Measurements are always indicated in centimeters.
- Underline or mark the instructions that are specific for your size (see example for size b) 42-44). Note: if there is only one number given, it applies to all the sizes.
This simple preparation helps you to follow the pattern more easily, as well as to avoid doubts and confusion during the process.
2 | When and how to knit the stitches
In each pattern you will find a table that indicates the thickness of the needles and/or crochet hooks together with the names of the stitches. The pattern will tell you which number of hook or needles is needed, which yarn color and which specific stitch.
If you are not sure how to knit the stitches of a pattern, we are sharing all these resources for you:
Guide to basic stitches in magazines and available as PDF
If you take a close look at the table (see previous image), you can read See instructions in basic stitches. All our magazines include a guide with explanations and illustrations of the basic stitches and techniques of making a garment. If you don´t have a magazine yet, you can download our free PDF with all these instructions here. You can also find the download link on each page dedicated to each magazine on our website (see image).

Extra information: In addition to the basic stitches and techniques, in both the magazine and this PDF, you can find a table of abbreviations used in patterns. You will also find a table of equivalences of our yarns, useful tips, how to follow a crochet chart … Download and save our complete guide to knitting and making garments!

Videos of basic stitches and other techniques
If you like to see how to knit basic stitches and techniques, you can take a look at our YouTube channel and Academy section. Here we share videos like knitting with standard needles, circular needles and crochet stitches.

Tip: If you visit the page dedicated to the model on our website, click on the names of the stitches used to see the corresponding video tutorial.
Graphs with symbols and a legend
If you come across fantasy stitches, stitches without video or stitches that are not included in the stitch guide, don’t worry! These stitches are explained row by row – following the table of stitches used – or with graphics that contain symbols and a legend. Which brings us to the third of the 6 tips for following Katia magazine patterns…
3 | How to read a graph correctly
Here´s another saying: step by step one goes far. Well, with knitting patterns it’s exactly the same. Square by square everything is woven. If you want to know how to read this grid full of symbols, here are some tips to correctly interpret a graph:
- Each square on a graph corresponds to a stitch explained in the symbol legend.
- Stitches are horizontal and rows vertical
- In horizontal we have the stitches and in vertical the rows.
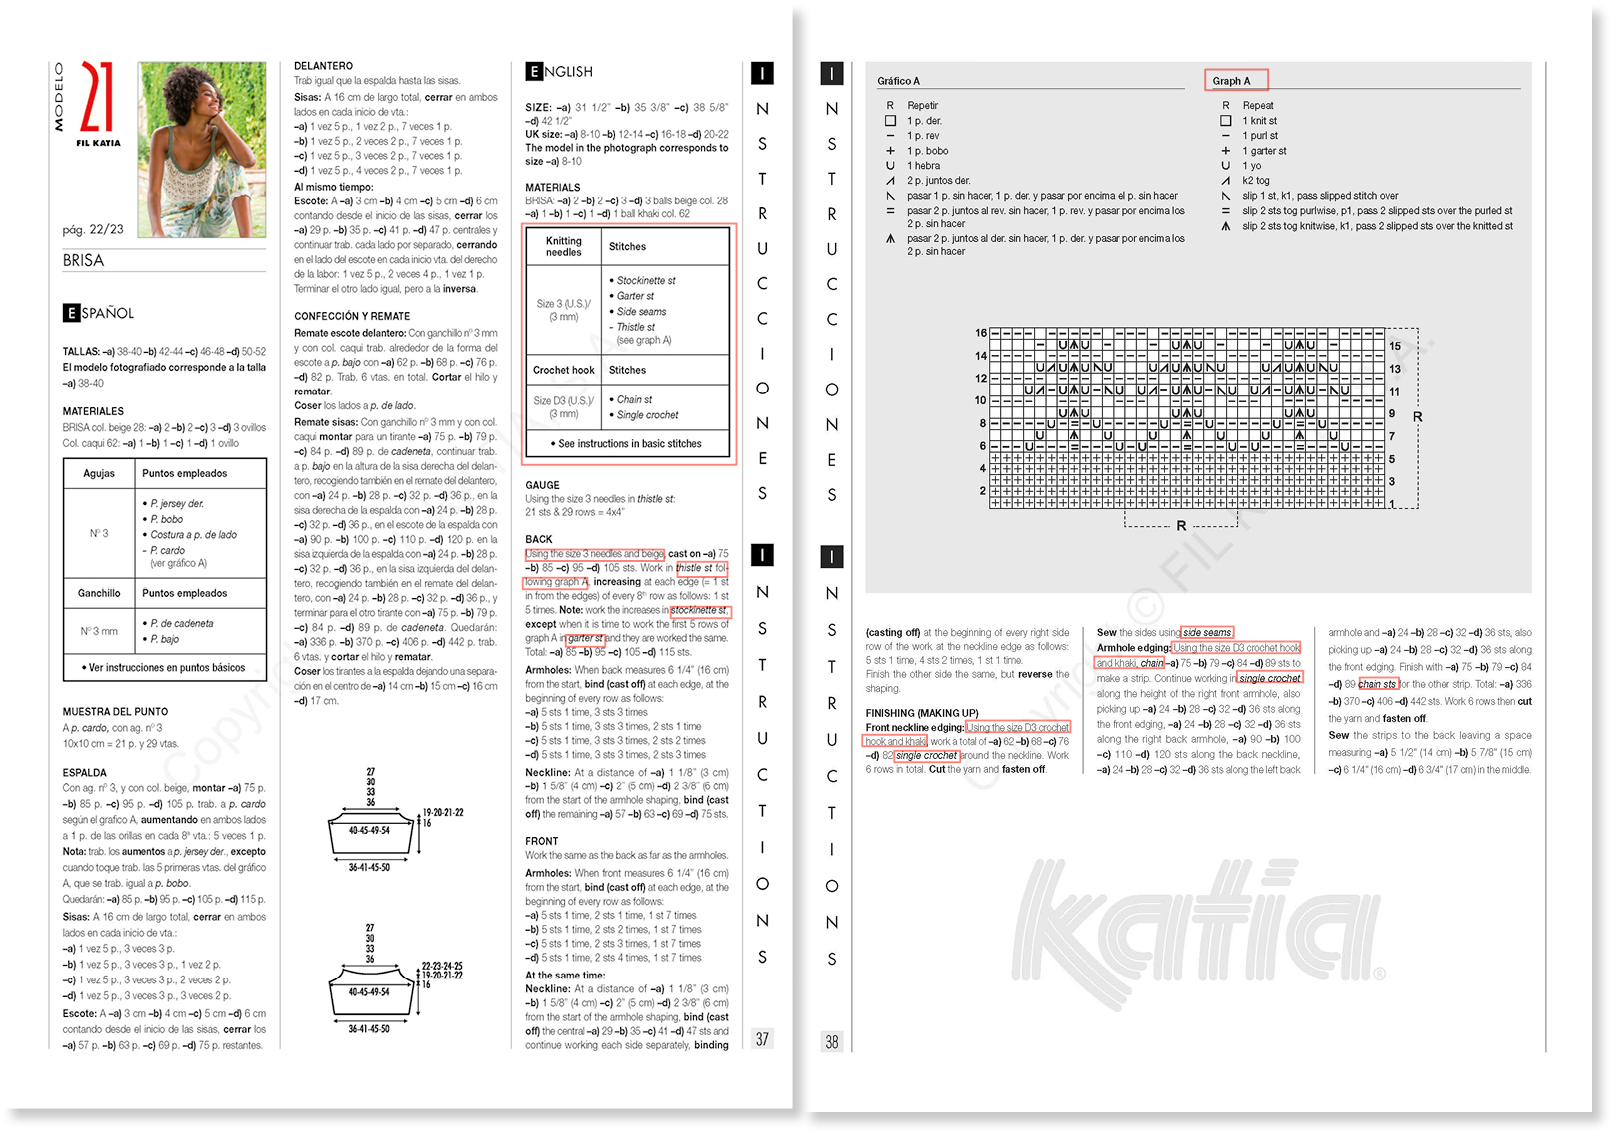
- Odd rows are read from right to left (1, 3, 5 …), while even rounds (2, 4, 6 …) are read from left to right. If you have a look at the graph, you can see that the number of each odd row is located on the right and each even row is on the left of the graph. This way you can easily see where to each row.
- What about that R? The R means you should repeat everything that is bounded between dashed lines. In our example, we repeat the 10 stitches indicated horizontally and the 16 rows of the graph.
- Before and after each R there are stitches to knit at the beginning and end of the row. In other words, before and after the repetition of stitches indicated by R.

Graphics with letters
The above chart is the same for all sizes, but you can find charts with different instructions for each size. In this case, uppercase letters are used (e.g. A, B, C, D, E) to indicate the stitches of the graph that need to be knitted according to each size. Note: The uppercase letters (A, B, C, D, etc.) do not correspond to sizes with small letters (a), b), c), d) etc.). Sometimes, however, the coincidence could occur that the knit size b) is indicated between B and B in the graph. Always follow what is indicated in the written pattern to know from which letter to which letter of the graph you need knit for each size.
Here is an example with different instructions depending on the size. The box in red (between letter D and D) is what we have to follow if we want to knit size b).

4 | Stitch tension & gauge
The tension of the yarn, the movements of the needles or the way of knitting changes from one person to another. To avoid future disappointments, we recommend to first make a little square. Invest some time and yarn and knit a sample with the same needle and stitch number indicated at the GAUGE section in a pattern. Then count how many stitches and rows equal 10 x 10 cm. If you get less stitches and rows than indicated in the pattern, you can make another sample with smaller needles. On the other hand, if you end up with more stitches and rows than indicated, you can try to make a sample with bigger needles. Stick with the needle size that is closest to the 10×10 gauge indicated in the pattern!
How to count rows and stitches in a 10×10 square
Check out the next video!
Recommendation: To knit your sample, add 4 or 6 extra stitches to the number of stitches indicated in the 10×10 of the pattern. Also, knit a few more rows than indicated, so you will have enough margin to count full stitches.
5 | What does it mean…
We will walk you through some common terms and written explanations of this pattern. We are going to solve some of the most frequent questions.
- … increasing at each edge (=1 st in from the edges) of every 8th row as follows: 1 st 5 times
This means you knit 1 stitch (= edge stitch), make 1 increase in the next stitch and continue knitting as indicated in the pattern until you reach the last 2 stitches of the row. Here you increase again and end with 1 stitch in the last stitch (= edge stitch). You now have increased on both sides 1 stitch from the edge. 😉
You continue knitting without increasing 7 more rows. On the 8th round you increase again on both sides, repeating what was explained above. Keep increasing on both sides 1 stitch from the edge every 8 rows.
You repeat this (increase 2 stitches on every 8th round, after the first edge stitch and before the last edge stitch of the round for a total of 5 times. This means you increase a total of 10 stitches (2 increases x 5 times), after knitting 40 rows (every 8 rows x 5 times).
In this video we show you how to increase stitches on both sides, at the beginning and end of the row, on the right side of the piece:
What does edge stitch mean?
The first and last stitch of each row are the edge stitches. As simple as that! And is it the same as the selvage stitch? No, that is something different… If you want to know more about the basic stitches, you can download our guide here.
- … bind (cast off) at each edge, at the beginning of every row as follows: -c) 5 sts 1 time, 3 sts 3 times, 2 sts 2 times.
You are going to cast off on both sides at each beginning of a row, that is, you must cast off at the beginning of the row on one side (= the good side of the piece) and at the beginning of the row on the other side (= the wrong side of the piece). You cast off 5 stitches at the beginning of the next 2 rows, in other words, you cast off 5 stitches on both sides 1 time (= 10 stitches total).
Then, you cast off 3 stitches at the beginning of the row (= knit side of the piece) and another 3 stitches at the beginning of the next row (= purl side of the piece). This must be repeated a total of 3 times. Remember that we bind off on both sides (= start of row knit side + start of row purl side) 3 times (= 6 rows ), 3 stitches each time (= 18 stitches total).
Finally, you cast off 2 stitches at the beginning of each of the next 2 rows (= knit side + purl side). You have to do this 2 times total (= 4 rows / 8 stitches).
In total, you knit 12 rows and cast off a total of 36 stitches (= 18 stitches on each side).
How to cast off stitches with two needles?
In this video we show you how to make a simple cast off with 2 needles:
6 | Visit the Model Clarification section on our website
We will end the sixth tip with a final saying: Making mistakes is human. And behind Katia there are quite a few humans! When we make a mistake, we add a correction in our Magazine Corrections section of the Katia Academy. Before you start knitting a pattern, we recommend checking out the magazine model updates. If you find any clarification of your model, download the PDF to make your pattern information complete. If you come across a mistake or something that does not add up in our patterns, please notify us through this contact form. Our Magazine Team reviews each query as soon as possible so you can continue with your project happily.

Hopefully, these 6 tips will help you to follow Katia magazine patterns more easily. If you have any other tricks or questions about how to read a pattern, please leave a comment below. Oh! And if you like the model used as an example, you can find it in the new Katia Casual 106 magazine or you can download it as PDF. Thanks for reading to the end! 😉